
Supporting more controllers with Steam Input
Do you want to support different controller types in your game on PC and you plan to release the game via Steam? Then you may utilize Steam Input library. This technology supports all standard controllers on PC – the ones used on consoles. This includes PlayStation controllers, Xbox controllers and Nintendo Pro Controller. I describe in this article how I approached using it for some of our games.
Problem to solve
We needed to add support for many controller types to our games. As we knew that they would be released on PC only via Steam, we went for Steam Input. I needed to integrate it with our in-house engine. Keep in mind that Steam Input requires Steam to work properly, so you cannot reuse it for different publishing platforms.
Steam Input library
Steam Input is a technology that lets you manage input for the game. This includes remapping. Instead of forcing the players that they should use ‘X’ to shoot, ‘Y’ to jump etc., you – as a developer – provide a list of actions. So, you have an action ‘Jump’, an action ‘Shoot’ and many more. You prepare a default setup, but the player is free to change anything.
Based on the comment in the code of Steam Input, it supports more than 300 devices.

As the player you can open Steam Input overlay and then change the setup.
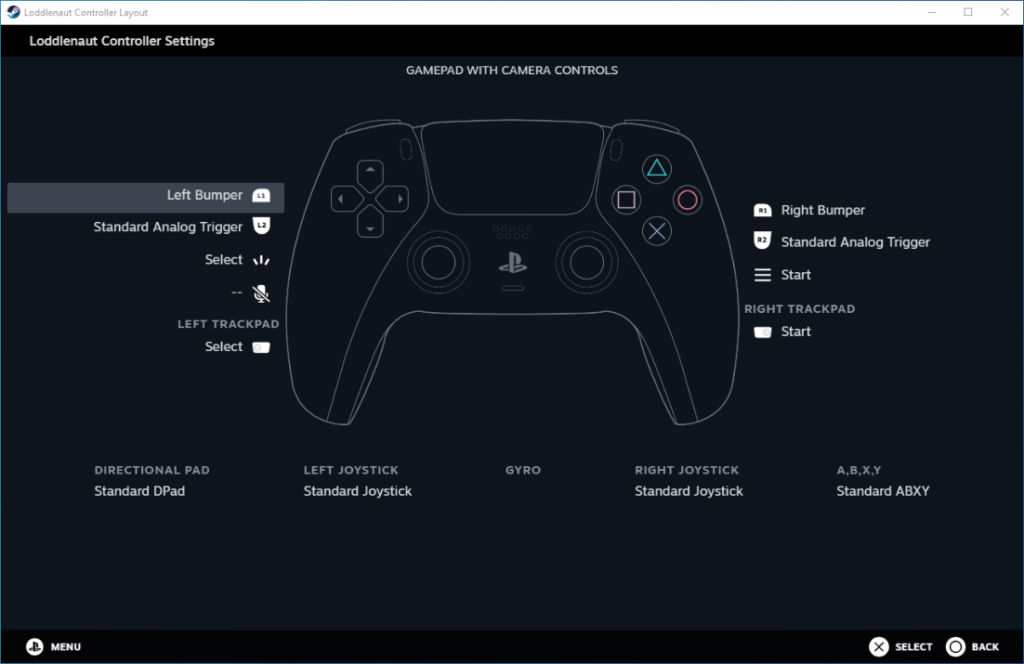
You can change the configuration for any controller type which is currently supported by Steam Input. Screenshot above shows sample assignments for PS5’s controller.
Steam Input is maintained by Valve. Due to the way it is managed, it offers additional benefit. Assume that you release the game which supports Steam Input. If it is not using live services, then after a few years, you will probably not actively develop it anymore. But let us assume that a new console is released – e.g., PS6. Then it will probably come with a dedicated PS6 controller. As the game developer you are not forced to update the game to add support for this new controller. As soon as Valve adds support to Steam Input for PS6 controller, any player who owns it will be able to use it with your game.
You may wonder how it works. When you integrate Steam libraries, then you only interact with small steam_api module. Steam client has a set of adapters for all released versions and automatically redirects or re-interprets the old calls. It is described in Technical Details section in the official Steamworks documentation. It is great that you do not need to update the game when Valve improves its code. However, you should be careful with assumptions. Based on the comments in isteaminput.h file, even the order of enum values is not guaranteed.
The settings for Steam Input can be found in Steam client. See screenshot below.

You may also notice a blue dot on the left of ‘PlayStation’. This means that this controller is currently plugged in. In case text is missing on the right of controller type, it means that specific controller type is disabled. Screenshot below shows an example for another game.

However, you may override this behavior in general Steam settings.

Note that the controller must be connected to change all its settings. Otherwise, you see information ‘No controllers detected.’

As a developer you can specify which controller types are supported by your game. The players will see this information in Steam Input overlay.
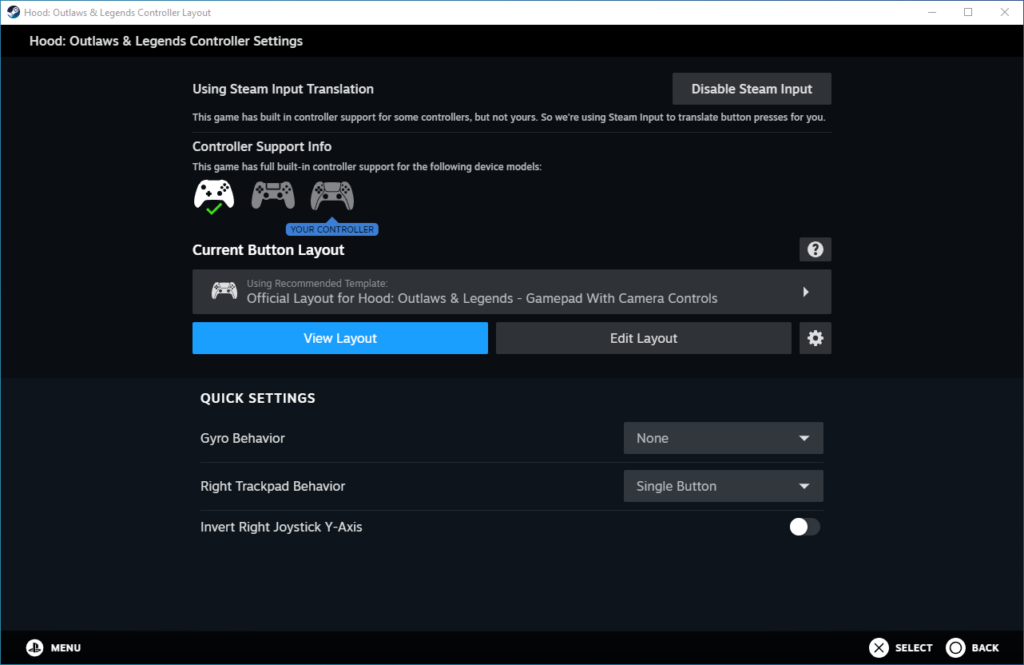
However, there are 2 controller types that are always required – Steam Controller (not manufactured anymore) and Remote Play. Beside these 2 required groups and the standard controllers (PlayStation, Xbox & Switch), there is also a Generic Controller for the rest of them.
Accessing controller layout
How to access settings related to Steam Input? When you are in the Steam Client and you are on the specific game page, then close to the top right corner you can find a gear. Once you click on it, then from the context menu choose Manage > Controller layout. This will open mentioned Steam Input overlay where you can change the mapping. You can open this menu even without starting up the game.

To open controller layout for the specific game, use context menu accessible via a gear button
As a developer you are free to trigger this overlay at any moment – for example when the player is in the menu and clicks the button for controls settings. Then instead of implementing it in the game, it is sufficient (and recommended!) to trigger this overlay. Keep in mind that the player may trigger this overlay at any moment.
Steam Input enabled confirmation
How do you know that Steam Input is currently in use? Once you start up the game and you have your controller plugged in, then you will notice a notification. By default, it is displayed in the bottom right corner. It is similar to Steam achievements unlocking notification that you may be familiar with.

Steam notification confirms that from that moment Steam Input is capturing the input from the controller
Controllers input
Before jumping into more technical details, I will describe the basics of using the controllers. There are 2 forms of input – digital and analog ones.

2 forms of input based on Steam Controller
On the picture above digital inputs are marked with yellow color. They are simpler to manage. For digital inputs Steam Input reports only 2 states. The button may be pressed and then an action is being triggered. Or it is not pressed, and this action is not triggered anymore.
Situation is different for analog inputs. For example, you have an analog stick and depending on the current angle for this analog stick, you will get a value from a specified range.
The most important thing to remember is that for digital input you only get 2 states. It triggers an action or not. For analog input you constantly get a value from a specified range. And it is up to the game to decide what to do with it in the current context.
Input configuration
Knowing about the inputs, we can prepare the configuration. Let us analyze existing one for free to play game – Warframe.
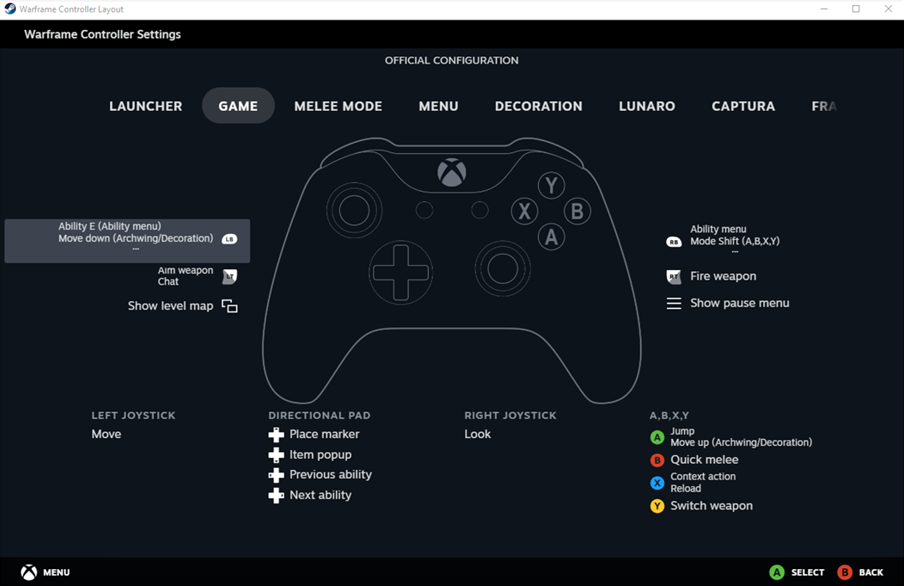
Picture above shows ’GAME’ ‘configuration.’ Most of the buttons and analog sticks have actions assigned to them. Additionally, button ’A’ has two actions assigned – ’Jump’ or ’Move up.’
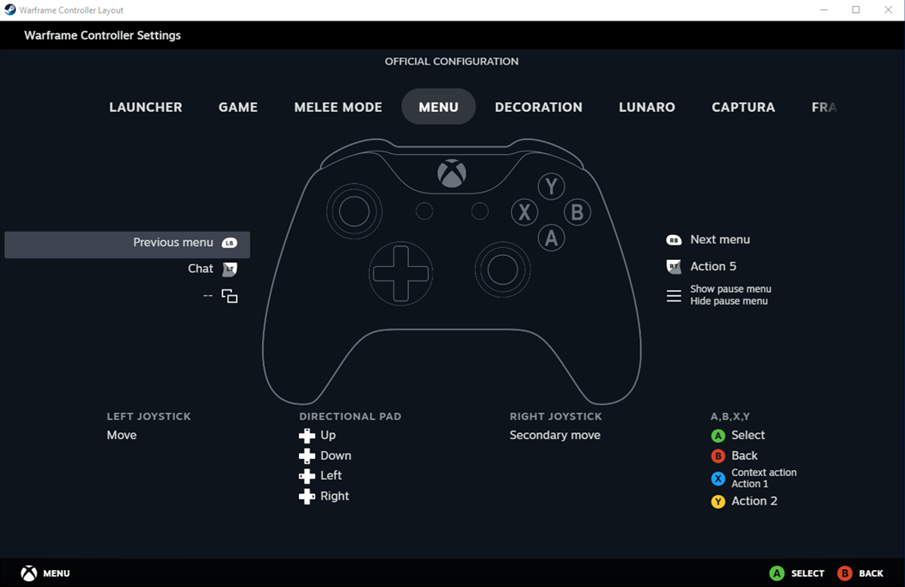
You may prepare multiple ‘configurations.’ Picture below presents ‘MENU’ ‘configuration’ where most of the actions are changed to different ones.

It is a developer who defines these actions. You should provide at least two sets of actions – for gameplay and for UI. Warframe has many more, but the approach is specific to the game.
Action sets
What is an action set? When you collect all analog and digital inputs valid in a specific context, they form so-called action set. These are exactly ‘LAUNCHER’, ‘GAME’, ‘MENU’ and other ‘configurations’ available for Warframe in the screenshots above.
When writing about action sets, I should also mention action set layers. Valve advertises them as additional and optional action set modifications. When you have a shooter game and you are using a sniper rifle, then probably one of the buttons triggers ‘zoom’ action. Once you zoom, some of the buttons may get a different meaning. So, on top of the current action set, you may apply action set layer which changes the behavior of smaller subset of inputs.
Adding your own wrapper for action set may significantly simplify the maintenance of your input system. You may go for similar interface to the one below.
void SteamActionSet::Initialize()

{

InitHandles();


// In case action set cannot be created (when no controller is plugged in), Steam API returns handle of value 0

if ((GetHandle() != 0) && GamepadUtils::ShouldActivateActionSet(GetName()))

{

SteamInput()->ActivateActionSet(STEAM_INPUT_HANDLE_ALL_CONTROLLERS, GetHandle());

}


// May happen when the first gamepad is plugged in when the game is already running

if ((GetHandle() == 0) || (AreAllDigitalActionHandlesInvalid() && AreAllAnalogActionHandlesInvalid()))

{

m_bHandlesRequireInitialization = true;


ClearActionHandles();

}

else

{

m_bHandlesRequireInitialization = false;

}

}
Changing action sets
I described adding scalability system to our in-house engine in my previous blog articles. We use it to change the quality, e.g., changing the resolution or quality of shadows to achieve target performance. One of the features that we have in our scalability system is dependency on the current game state. Briefly, when the cutscene is started or finished, or fighting with the boss, then different settings can be applied. To achieve it, we need to track current game state. So, when integrating Steam Input, I reused this information. Specific action set is applied depending on current game state.
Input remapping
When starting work on the implementation, I needed to check what we already used in our in-house engine. We had an input system that was mostly relying on the configuration in *.ini files (in a format of key-value pairs). However, button remapping was not possible during the game.
Changing input mapping is one of the fundamental features of Steam Input library. This meant that I needed to make some adjustments in this area. I also needed to move these configurations from *.ini files to VDF files. Format of the latter is quite similar to JSON files. Official documentation provides examples, so I will skip differences between VDF and JSON formats.
Integration plan
When integrating Steam Input to your engine, you should provide at least a thin translation layer. You will still need an operable input system outside of Steam. Even if you plan to release your game only on this platform, the player may start the game without Steam client running. In such scenario, you should not end up in a situation that the game is unplayable.
It is worth falling back to alternative method also in runtime. Even though more than 300 devices are supported by Steam Input, there is still a chance that the player may have a device that is currently not supported. Probability of such situation is low but if you have such device, then you may add support for it. We had such a case in one of our projects. At the end it was possible that in local co-op one player uses a controller managed by Steam Input and the other one the controller for which we added the support.
You can only have one action set active at any given moment. So, in case you have handling of actions mixed between UI & other game modes, then you must clean it up to make it work with Steam Input.
For digital actions Steam Input provides you only information whether specific action is currently triggered or not. To support presses, holding and releases, you need to implement tracking of the earlier states. It is illustrated in a table below (to simplify detection of holding the buttons, at least 2 frames are assumed, but in a real game/engine you should rather wait for specified amount of time).
| Frame number | 1 | 2 | 3 | 4 | 5 |
| Button pressed | No | Yes | Yes | Yes | No |
| Press action | No | Yes | No | No | No |
| Hold action | No | No | Yes | Yes | No |
| Release action | No | No | No | No | Yes |
Potential issues
In this section I will mention two Steam Input behaviors that surprised me. Keep in mind that they may change in future Steam client/Steam Input library releases or even at the time of releasing this article.
First, if you do not have any controller connected, then you are not able to request an action set handle. You must collect these handles of actions and action sets to be able to use the controller. However, it may happen that you initially do not have access to them, when you start up the game with only mouse and keyboard attached. To support the case when player plugs in the controller when the game is already running, you must collect actions and action sets handles later. You need to postpone initialization logic until the moment when the first controller is connected. This is the reason of adding Initialize() and IsInitializationNeeded() methods to SteamActionSet class snippet in Action sets section.
Additionally, it is impossible to change action set when no controller is connected. So, when you are playing using your controller but as some point you unplug it for whatever reason, then our game displays a full screen message that the controller is disconnected and asks to connect it again. Let us assume that you are in the gameplay when this happens. If this was the only controller, we are not able to change action set to ‘UI.’ Action set layers cannot be changed in such case.
Complementary actions
Be careful with assigning transitions between action sets, which are complementary, to the same button. It is specific scenario that you may discover later on. It may be acceptable to have button ‘X’ assigned to confirmation in the UI and the same button ‘X’ used for jumping during gameplay. These actions do not mirror themselves. However, I will get back to potential caveat later. But first I will describe the issue with complementary actions that I faced during Steam Input integration. Picture below shows the timeline.

Let us assume that no button is initially pressed, and action set ‘Gameplay’ is active. Then the player presses a button mapped to menu opening.

This means that an action is triggered.

Since this is part of the game based on UI, transition from ‘Gameplay’ action set to ‘UI’ action set is triggered.

So now action set ‘UI’ is active. In the next step (during next frame) the logic checks whether any action should be triggered. The answer is ‘Yes.’ Menu button is pressed, so associated action should be triggered. In the context of action set ‘UI’ this means that we are triggering menu closing.

You can already guess where it is going. By closing this UI, we transition back to the action set ‘Gameplay’.

We are again checking the input. Player is still pressing menu button. This means that we should show the menu.

After going into the menu, we are again in the action set ‘UI.’

This was the initial setup. When I checked this functionality for the first time, I pressed the menu opening button and the UI was in the loop of opening and closing. The approach that I presented in the table in the previous section was not enough to prevent such issues. To address this, when changing action set, I added checking whether any digital actions are already triggering the functionality. Then I marked all of them immediately after action set change. They are blocked until the moment when their triggers stop. In other words, the implementation is waiting until the moment when the button is not pressed anymore. These actions are unblocked after releasing of the button.
In the example above you still have the same button assigned to complementary actions. You press it and the UI opens. But then you must in the first step release this button and then press it again to close the UI.
Such approach covers other issues. If the height of jump depends on how long you hold the button, and the same button is used for closing the UI, then the character may be always jumping after closing the UI. By forcing to release the button first, you fix such issue as well.
Undocumented behavior
Not all Steam Input behaviors are fully documented. For example, when you are creating an action set and you get a handle to this specific action set that is equal to 0, it means that this action set handle is invalid. Neither it is stated in the documentation, nor there are any constants in the headers to use. Similarly, when requesting information about actions you may get handles equal to 0. Again, these are invalid ones. I also added checks for getting empty lists here and there. Most probably for these cases no controller was attached. Needed data must be collected later – once the first controller is plugged in.
void SteamActionSet::Initialize()

{

InitHandles();


// In case action set cannot be created (when no controller is plugged in), Steam API returns handle of value 0

if ((GetHandle() != 0) && GamepadUtils::ShouldActivateActionSet(GetName()))

{

SteamInput()->ActivateActionSet(STEAM_INPUT_HANDLE_ALL_CONTROLLERS, GetHandle());

}


// May happen when the first gamepad is plugged in when the game is already running

if ((GetHandle() == 0) || (AreAllDigitalActionHandlesInvalid() && AreAllAnalogActionHandlesInvalid()))

{

m_bHandlesRequireInitialization = true;


ClearActionHandles();

}

else

{

m_bHandlesRequireInitialization = false;

}

}
Development-only functionality
It is common to have development-only tools in the non-shipping builds. That way you may quickly progress or even jump to specific sections of the game. However, the mechanism for triggering these functionalities should not be shared with the players. It is especially critical in games offering any form of multiplayer experience. Unfortunately, you cannot add new action set to existing configuration. By adding them to official configuration and publishing them via Steam, the players would learn that the game has implemented cheats or debug menus. Even if we disable them in the final product, we do not want to reveal that we have them and what they do.
Differences between controllers
Initially, I prepared the setup only for the Xbox controller. Steam Input was translating it automatically to different controller types. This part went smooth. However, there were a few cases that required special handling. In the picture below you can see the Xbox controller on the right and Switch Pro controller on the left.

Nintendo Switch Pro vs Xbox controller
We had, for example, a jump button assigned to the button ‘A.’ So, once you pressed the button which is the bottom one in the group of colorful buttons on the Xbox controller, you were jumping.
If you imagine that we remove all the labels from these controller buttons, then you use corresponding button in the group on the Switch Pro controller to jump. However, this may not be what the players are used to. Mentioned action is triggered with the ‘A’ button on the Xbox controller. But this is the ‘B’ button on the Switch Pro controller. To still use ‘A’ button for jumping, you can provide additional configuration just for Switch Pro controller where you swap both ‘A’ with ‘B’ and ‘X’ with ‘Y.’ However, if this is the only adjustment that you want to make, you should rather consider relying on ‘Use Nintendo Button Layout’ that Valve added at some point. You may also consider regional differences.
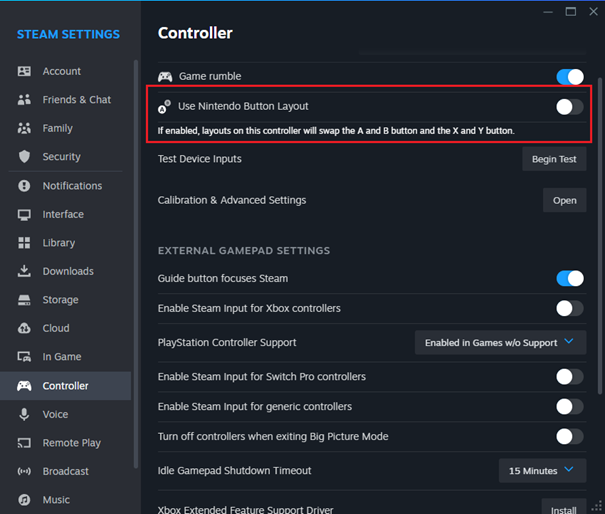
By using ‘Use Nintendo Button Layout’ players may adjust these behaviors for all the games
If you do not plan introducing differences in configuration for different controller types, you do not need to duplicate it. However, we had an issue with PS5 controller which was not possible to fix in ‘common configuration.’ In comparison to PS4 controller, PS5 controller has an additional button that I marked with red ellipse in the picture below.

During initial Steam Input integration, I did not manage this specific button in any way. Its default behavior on Steam Input was triggering a screenshot. However, it mutes the microphone on PS5. So, if you are PS5 owner, then you rather do not expect using this button for screenshot capturing. PlayStation controllers (both PS4 & PS5 versions) already have a dedicated ‘SHARE’ button. It is clearly described on PS4 controller as ‘SHARE’ and it has a similar position on PS5 controller. To change this behavior, you need to introduce additional configuration which adds additional maintenance cost. If you decide to change any mapping, you need to duplicate the behavior for all configurations that you have.
Summary
Despite described challenges when integrating Steam Input, it is still worth doing it. I highly recommend using this library. Buying more than three hundred devices would be impractical, not even mentioning testing the game on each of them. Moreover, once new hardware appears, you may rely on Valve to add support for it to the Steam Input library.
When you consider using Steam Input, you should design your input system around actions. Then the integration should go quite smoothly. Moreover, it simplifies maintenance of input for your game. Steam Input overlay offers a mechanism for both remapping and sharing the configuration between the players, so you do not need to implement it for your game.
Useful links
See also: Scalability. Adjusting visual quality for all platforms
