Scalability. Adjusting visual quality for all platforms
Scalability? What’s that? Even if you have not heard about such systems before, you might already be using them but only for default settings, because Unreal Engine has one, and it also provides an official documentation about its scalability system. Long story short, scalability allows you to control the quality of visuals in many various aspects. The goal of having such a system is to achieve the best performance on target hardware whilst retaining visual quality as much as possible. In this article, I will describe how to approach creating or extending scalability systems.
Scalability system benefits
A good scalability system provides an interface that allows you to quickly tweak settings. If you change the quality of shadows, you should be able to immediately check how a game will look in your editor tool. This allows you to quickly iterate on settings.
Once you have the scalability system in place, you can add new parameters to it, in a structured way. It makes sense at some point to organize them in related groups, so it’s easier to manage them. Moreover, by having such settings grouped together, you can easily display them via UI. This way, the players can tweak them to whatever end users prefer, without a need to understand what is going on under the surface.
As a developer, you may want to have more control over specific settings. A good example of development-only functionality that can control in-game scalability, is available in Unreal Engine’s console.
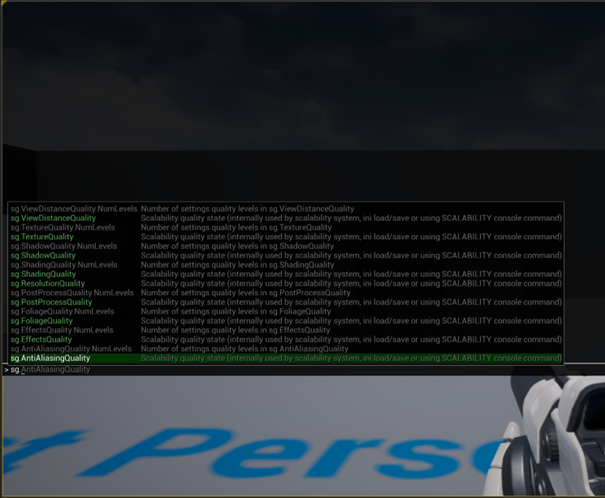
Scalability settings can be accessed in Unreal Engine via in-game console
An exposure of such settings in the in-game console allows you to quickly check the best settings in the editor tool without rebuilding the game, and on target hardware.
How did it begin?
When I joined PixelAnt Games, I was asked in the first project here to prepare a scalability system for an in-house engine. Note that I am often referring to Unreal Engine in this article when describing some general concepts, because UE is openly available. However, our engine did not have such a system and we worked on a project for multiple platforms – both PC & consoles.
How it works?
Before we jump into the topic in a more detailed manner, we need to be on the same page in terms of basics. I will now briefly explain how a good scalability system works. Let me give you an example based on some Unreal Engine settings. Initially, we start with a single property – a detail mode:

You can ignore the ‘r.’ prefix in this case. Once you set the detail mode to 1 when the game is running,

it affects the way the game looks. In this case, it will show more details than at the lowest level. The detail mode equal to 0 is the lowest possible level for details. So, we would then display as little details as possible. However, when we set it to 1, we display a bit more details. You can have multiple such properties. You can add, for instance, particle light quality:
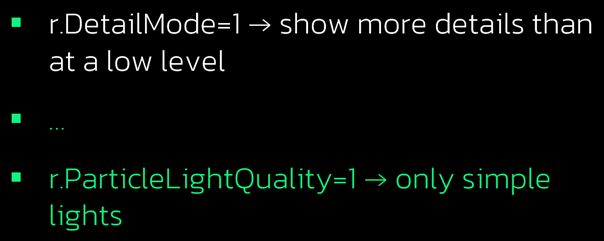
In this case, we will display only simple lights. So, we are not disabling all the lighting, but we display only the simple ones.
Once you group many related properties, then they can form a so-called scalability group.

As you can see here, the group name starts with the meaningful prefix – ‘sg.’ This describes the effects’ quality. Therefore, once you set the effects quality to 1, this results in setting all these parameters on the right to predefined values.
You can have multiple scalability groups. For example, let’s add shadow quality:

And all the scalability groups combined form the so-called device profile.

Once the game is running and you set its device profile to the correct platform (instead of example ‘Platform A’ in the picture above), then you trigger a whole cascade of changes. Each of the scalability groups is set to the specified level, and then each level sets the setting of all individual properties to the predefined values.
UE base scalability files
Knowing the basics, we can proceed with storing the scalability settings. I will also use Unreal Engine as an example you can have easy access to.
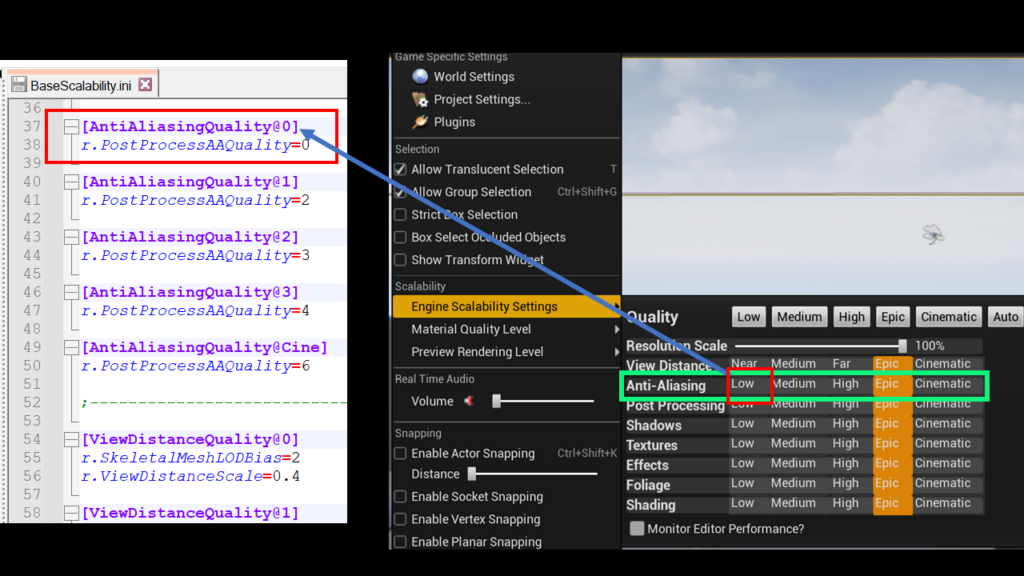
On the left, you can see a snippet of a BaseScalability.ini file. I have marked an anti-aliasing in both this configuration file and in editor settings. The part between ‘@’ & ‘]’ characters specify the level. So ‘0’ in:
[AntiAliasingQuality@0]
corresponds to the level ‘Low’. Then we have level ‘1’, which corresponds to ‘Medium’, and so on. The highest one is ‘Cine’ – the special one for ‘Cinematics’.
We have ‘r.PostProcessAAQuality’ inside these scalability group levels. This is a console variable. As we already know, we can change console variables via the in-game console.
The scalability system in Unreal Engine provides more functionalities, but now you should have a general understanding of how such systems work.
How to implement scalability system?
As I already mentioned, our in-house engine did not have any scalability-like system. Given that it’s been developed for many years already, the development of many projects using this engine was ongoing, back then. So I needed to carefully plan the implementation. I investigated what our in-house engine offered, and I met with other developers to learn and understand their needs.
Initial technical design document
After collecting all the information, I prepared a technical design document to describe how the functionality will be implemented. It had the information on how to apply the default settings for base scalability and on how to override them on each platform.
Then there was an open question on the way they would want to approach auto-detection of PC capabilities. This is specific to PCs because of a more complex situation there, than for consoles. What is the difference? Let’s focus now on Nintendo Switch. for a bit. Every Switch console unit, when you play the same game on it, will behave the same way. It does not matter which Switch console you use, at least in terms of performance. When considering PCs, you have the same version of the game for both old low-end laptops and for bleeding-edge gaming machines, so the user experience will be totally different.
The initial technical design document also described the various settings based on many factors. For example, we had the idea, during the brainstorming session, that we could tweak the settings when we are in the normal gameplay, because we wanted to achieve better performance, we wanted to be sure that the immersive experience is not broken. Maybe we could lower down some settings? A completely different case occurred during the cut-scenes, when we wanted to achieve better visuals. In other words, we wanted different settings based on current game state.
I also took into consideration the display resolution. If users only had a Full HD display attached, then there was no point going for 4K because the players would not see it anyway.
I also planned different settings based on console state. This is only applicable to Nintendo Switch. For Switch, we have a docked state, i.e. when the console is connected to TV via a dedicated dock(mode not available for Nintendo Switch Lite). Undocked state is applicable when the handheld console is running solely on battery. This is the state when Nintendo Switch offers lower performance.

INITIAL IMPLEMENTATION APPROACH
I provided this technical design document for review. After initial feedback, I dropped a few things. First, I removed platform detection capabilities. Knowing the hardware diversity for PCs, we would need to guess what would be the best settings to run on, to ensure that the game is still running smoothly. That was a must-have feature before releasing our top priority game back then. However, it is not something that you need to have in the initial implementation of a scalability system. I will describe auto-scalability in a future article.
Different settings based on the current game state were also dropped from the initial implementation. The reason for such a decision was the added complexity that would require from the system. First, we wanted to make sure that the initial implementation works well and verify if it is sufficient. Different settings based on current display resolution were dropped as well, for the same reason.
INITIAL IMPLEMENTATION HURDLES
One of the first things that you should consider when implementing scalability systems is the parsing of configuration files. If you are not starting your own engine from scratch, then you probably already have one. Depending on how far the current configuration files are from your planned format, you may want to reuse at least part of the parser’s logic. We already had an existing implementation that loaded some parameters we wanted to change with the scalability system. It then makes sense to have a similar (if not the same) format to load both default and a list of all possible values.
The issue was that this was not the first game based on this engine, and the development of a few other ones was ongoing. I found many configuration files spread across many directories, but it was unclear which of them were in use and when. Since not all of them were loaded on startup at once, I did not know how to check whether I was breaking anything.
Moreover, loaded data must end up somewhere. We already had a module for managing properties. Therefore, it was logical to extend that module. However, this part, the very core of the engine, was used everywhere. I needed to be sure that I would not break anything. I needed to change the way it affected the rendering, which needed modifications anyway. But it was also used for AI. The file configuration parsers were significantly shared with our input management system. This system needed to load data like which button to press to trigger a specific action or interact with our UI. Also, cut-scenes and many other systems were at least partially dependent on parsers or our properties management system.
RISK MITIGATION WHEN INTRODUCING A SCALABILITY SYSTEM TO AN EXISTING ENGINE
I needed an approach that could ensure that I wouldn’t be breaking the entire system. That would have resulted in a complete disaster. Even worse – it could have blown up a few months later. So, I needed a smart approach to both the source code and the configuration files. Our existing configuration files were designed in a way that it was easy to change them, even manually, and with no development skills. This was creating a risk that someone might introduce a change that would break the system. I also needed to prevent that.
In one of the former companies I worked for, I had already learned that the less code, the fewer bugs. That was a good time to start thinking about design patterns. For configuration file parsers the solution that I went for leaned towards the template method.
Another aspect of this situation was related to configuration files. I needed to find a way to prevent a delivery of files that could break the system. We already had a rule in place that we were not allowed to deliver changes without getting the ‘green light’ from our build machines. The code had to be buildable, and it had to pass all tests. We already had automatic tests, so it was quite normal to consider adding new ones only related to scalability configuration files. The logic behind my tests run only a fraction of a second, so we were able to force each future change to pass this process.
After taking these steps, once I had delivered my initial implementation of the scalability system, nothing broke.
ADDING NEW FEATURES TO THE EXISTING SCALABILITY SYSTEM
After I had delivered my initial changes and people started using the scalability system, it was easier to prioritize future work. But not all wishes are worth implementing. Sometimes, it is better to use existing functionality if it is possible to achieve goals. As I have already mentioned –the less code, the fewer bugs.
SKIPPING DEFAULT VALUES IN CONFIGURATION FILES?
Among many ideas, I was asked to simplify configuration files format. For the settings that were common for multiple levels, colleagues wanted to skip them. Similarly, if the values in configuration files are equal to the default values in the code.
Back then, I hadn’t had any hard arguments against that idea. I hadn’t planned it when preparing the initial technical design document. So, it started happening.

For example, you can see in the picture above that someone added hybrid shadows to a shadow quality at level 0. But that person did not add it to the shadow quality at level 1, etc.
I allowed this to start happening because back then, it was not breaking anything. However, that didn’t last long. But I will get back to it in a section about resetting scalability settings. Before that, you need to have a bit of context. To observe any issues with such an approach, it has to be possible to dynamically change the settings.
DIFFERENT SETTINGS BASED ON THE CURRENT GAME STATE
Different settings based on the current game state was one of the functionalities that was dropped after an initial review of the technical design document. It was a good call to not deliver it as part of the initial risky change, but it was also worth planning for adding it later.

In the picture above, you notice on the left a configuration that was used before. On the right, you see a fragment of the configuration file into which it has evolved. You notice that, in addition to the ‘PlatformA DeviceProfile’, it also now has the ‘PlatformA+NormalGameplay DeviceProfile’. This is associated with the most common gameplay for our title. So once the game is in that kind of state, different settings than the default ones are applied. Next, you have another one – ‘PlatformA+Boss DeviceProfile’. Due to the keyword ‘BaseProfileName’, this is based on the profile ‘PlatformA+NormalGameplay’. When the player is in normal gameplay or during a fight with the boss, the same settings will be applied. Moreover, we are not forced to copy and paste the whole part describing the difference in the base device profile.
RESETTING SCALABILITY SETTINGS
At one moment, we discovered a bug. Allow me to briefly describe the situation. We had issues with the performance on one of the platforms, so we needed to find some improvements. At some point, someone needed to reuse a different scalability group level during the ‘normal gameplay’. In this case, we were changing a shadow quality level to 0. Up until that point, this level was used only on the weakest-performance platform. There was no issue back then. However, once we had started using this shadow quality level on more powerful platforms, we proceeded to enable hybrid shadows (as described when changing settings based on the current game state).

As you can see on the left side of the diff above, after going back to the shadow quality level 1, after a more performance-heavy part of the gameplay, hybrid shadows were not being reset. That was because hybrid shadows were not defined for the shadow quality level 1. We needed to add it for this level as well. The solution to prevent such issues from happening again was to add all the settings that existed for any scalability group level, to all the other ones.
I also added an automatic test. In case someone wanted to add a property but would forget to add it to any other group level, then build machines would trigger an error notification and provide a list of what’s missing.
EMULATING CONSOLE QUALITY ON PC
Then I got another request – to emulate the console quality on PC. It was related to the fact that our artists did not run the game on devkits. They were not aware of how the game would look, for instance, on Nintendo Switch. It seemed quite easy to implement. Initially, I only needed to add the loading of configuration files for consoles on PC and simply apply the settings.
But then they contacted me again, and it turned out that artists not only didn’t run the game on consoles, but on PCs neither. They were simply using an editor.
On some platforms, we had to save a lot in terms of performance in comparison to the most powerful platforms. You can easily drop the quality of shadows, details, etc. However, each console type is only capable of supporting limited resolution.
When designers or artists use a 4K display and editor in full screen mode, then the preview is much bigger than, for example, Full HD (1080p) – the maximum resolution supported by Nintendo Switch. This was resulting in a situation where we tweaked quality settings for many platforms, but we were still rendering at higher resolution than what the given console type could support. That did not reflect the situation that players could have on the console. I needed to make sure that for lower resolution, we simply stretched instead of using the whole preview size as render resolution.
DIFFERENT SETTINGS BASED ON CONNECTED DISPLAY RESOLUTION
Then we decided to implement another functionality dropped in the initial implementation – different settings based on currently connected display resolution. Let’s jump straight into an example.
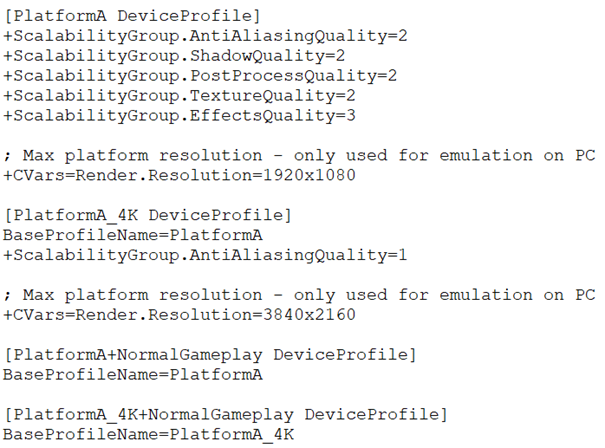
By default, the game runs at Full HD. The configuration file fragment above defines another device profile – ‘PlatformA_4K’ – which is based on ‘PlatformA’ device profile. However, it is designed for 4K. You can create a copy of any device profile if you want to change some settings in the 4K variant. We have the logic implemented which, based on currently connected display resolution, applies the necessary device profile – with or without the ‘_4K’ suffix for the example above. There are many combinations:
- PS5: 1080p/4K
- Switch
- TV Mode (docked): 1080p
- Handheld Mode (undocked): 720p
- Xbox One
- Xbox One: 1080p
- Xbox One S: 1080p/4K
- Xbox One X: 1080p/4K
- Xbox Series X|S: 1080p/4K
The base version of PlayStation 4 can achieve 1080p at maximum resolution. However, PlayStation 4 Pro can still run at Full HD, but it also supports 4K resolution – that’s the case for PlayStation 5 as well. As for Nintendo Switch – it depends on the console state (docked or undocked). The situation is also complex for the various Xbox consoles.
DEALING WITH COMPLEXITY OF CONFIGURATION FILES
At one point, some team members were pushing for full flexibility – being able to change any settings during any game state, any combination of display resolution, etc. At the same time, others started complaining that configuration files for scalability became too complicated. We had conflicting wishes, and one may wonder if that was the right time to have some sort of trade-off… Luckily not!

On the left, you can see simplified content of the configuration files format used up until that moment, and on the right, you see what happened after addressing the complexity issue. These formats result in the same behaviour.
That was possible because I introduced another keyword – ‘DuplicateToProfiles’. Once the player had one of their device profiles specified and all the settings defined for it, a list of device profiles could be provided for which the player wanted to reuse all their settings. This resulted in a situation where we were not forced anymore to copy & paste many of the device profiles.
LAST TOUCHES
If your game constantly uses the same graphic settings, the situation is quite simple. However, it all becomes more difficult to manage when you dynamically update them during gameplay. Let’s assume you have multiple device profiles. You can have one device profile – ‘DeviceProfile1’ – which sets a property to value ‘A’. You also have another device profile – ‘DeviceProfile2’ – which is based on ‘DeviceProfile1’. It sets the same property to value ‘B’. You copy the second device profile to another one – ‘DeviceProfile3’ – which sets this property to value ‘A’ again. I present this situation in the table below.

There is no point in overriding a property value and overriding it yet again – especially when setting any property may result in triggering callbacks! I added collecting final values and applying them only.
Furthermore, you need to apply the settings at a specific moment. Let me give you an example of a potential issue when you don’t do that. You may change a device profile when the game has already started rendering a frame. Let’s assume that a particular device profile change triggers shadow quality change. Frame rendering continues but with different settings. This may result in extremely hard-to-track bugs – only one frame artifacts that may be hard to even reproduce. That is why in our in-house engine, settings are applied before we start to render the next frame. They are scheduled in a game thread but applied in a render thread.
SUMMARY
To sum it all up, a robust scalability system takes into consideration many aspects in order to achieve the best performance on target hardware, while retaining visual quality as much as possible. It should be data-driven, so that the final quality setup can be tweaked quickly and without the need to rebuild the game. A good scalability system should offer – but not force, configuration based not only on the platform type, but also on game states or currently connected display resolution. Moreover, given how easy it is to change and break the scalability configuration, it is worth implementing automatic tests to detect errors.
See also: Auto-scalability – Smart adaptation to PC capabilities
