Rendering Millions of Grass Blades Using UE and Niagara
I am Radek Paszkowski, a software engineer with a passion for computer graphics, games, tech, painting, and music. Currently bringing pixels back to life at PixelAnt Games, focusing on graphic programming. In this blog post, I’ll share tips, tricks, and tools to effortlessly implement a new grass technique.
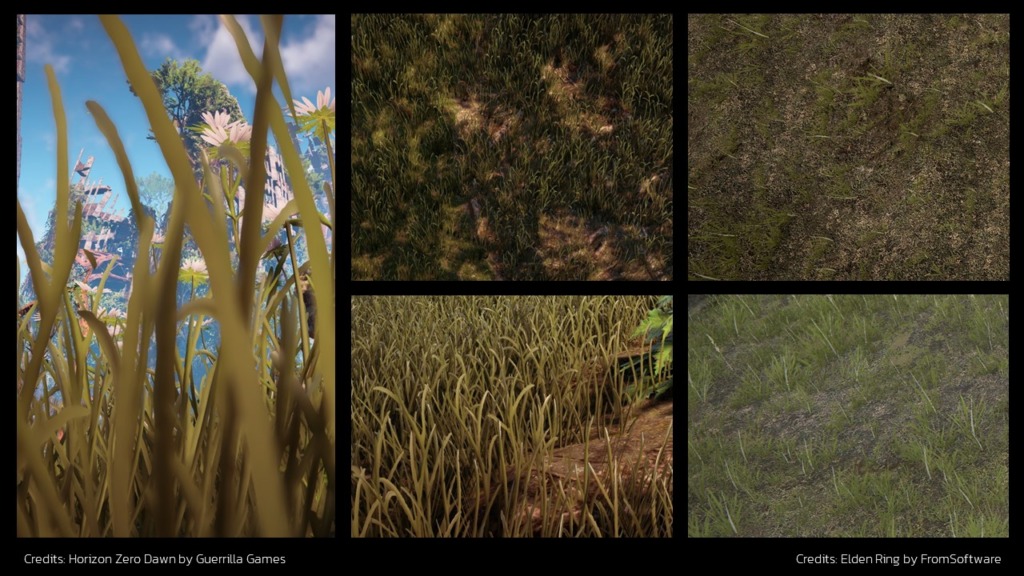
Games usually use flat planes with a grass texture for their grass. These can be simple squares or more detailed shapes. You can see examples of them in games like Horizon Zero Dawn and Elden Ring. While you might not see problems at first, looking closely shows issues like intersecting lines, limited light effects, strange movements, and grass disappearing when seen from above. These are things we’re used to with this method.
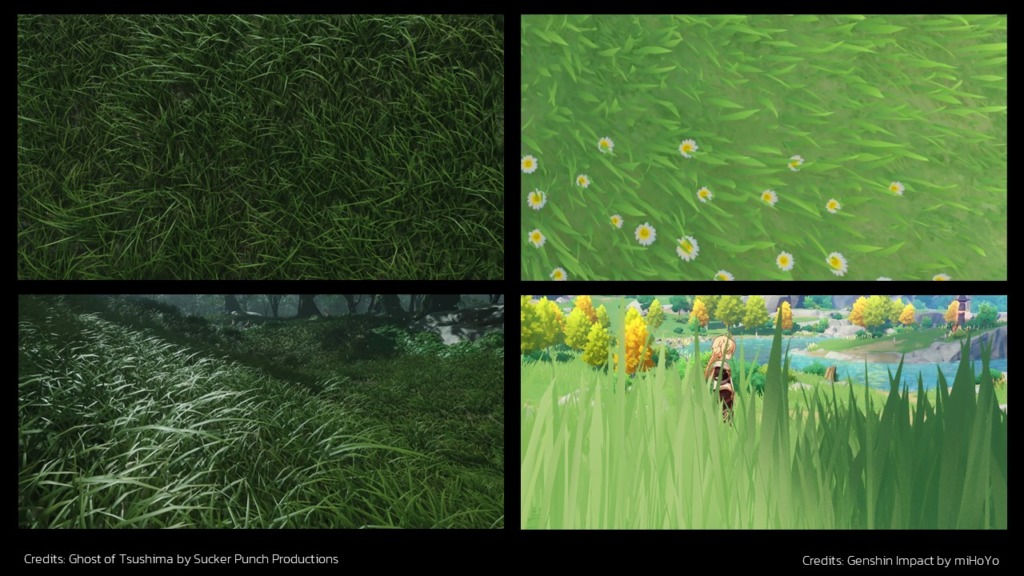
Let’s talk about the newer approach called per-blade mesh grass. Games such as Ghost of Tsushima, Genshin Impact, and Zelda: Breath of the Wild were the ones to already use this technique. It gives denser grass that responds better to light. Grounded, a game I love, does something similar, treating each grass blade as its own entity with its own mesh, creating a visually striking effect.
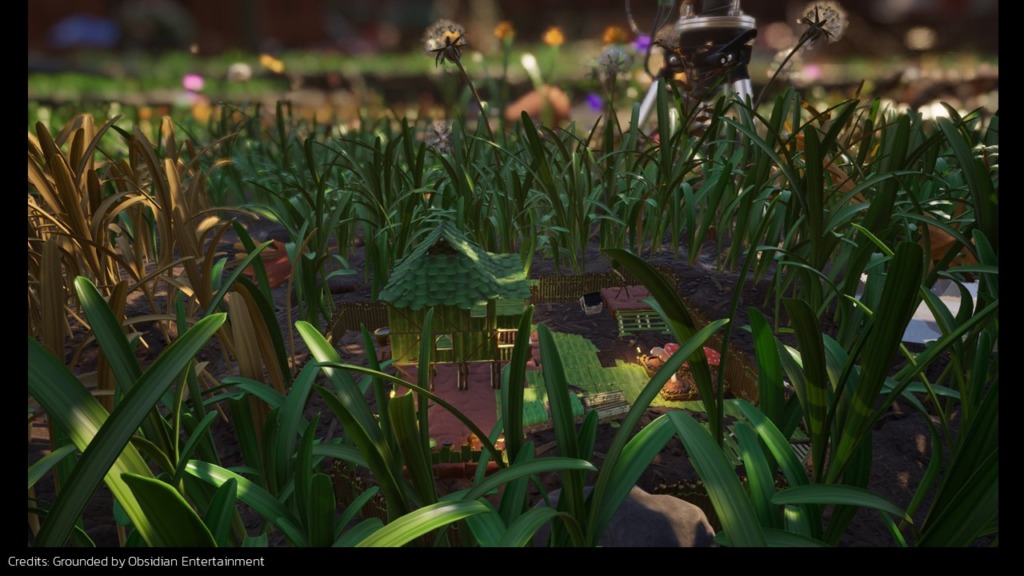
However, embracing this new technique requires some assumptions.
- 3D opaque models: The grass needs to be represented as a full 3D opaque model. This removes any concerns about transparency, sorting, and overdraw. However, this method demands a significantly higher number of instances compared to the earlier technique.
- Millions of instances: We need a significantly higher number of instances compared to the earlier method
- Interactable: The grass should be interactive, able to respond to the player, wind, and other in-game elements. This interaction adds depth and realism to the environment.
- Deterministic: It’s crucial for the grass to have a deterministic behavior. As the player moves, the grass should keep its appearance relative to the player’s position. This means it shouldn’t awkwardly follow the player’s movements but instead render around the player in a consistent manner.
- Artists authored: The grass system should allow artists to author and modify its appearance, giving them creative control over the look and feel of the grass.
- Real-Time Performance: Given that this is for gaming, the system must run in real-time, ensuring smooth rendering and responsiveness within the game environment.
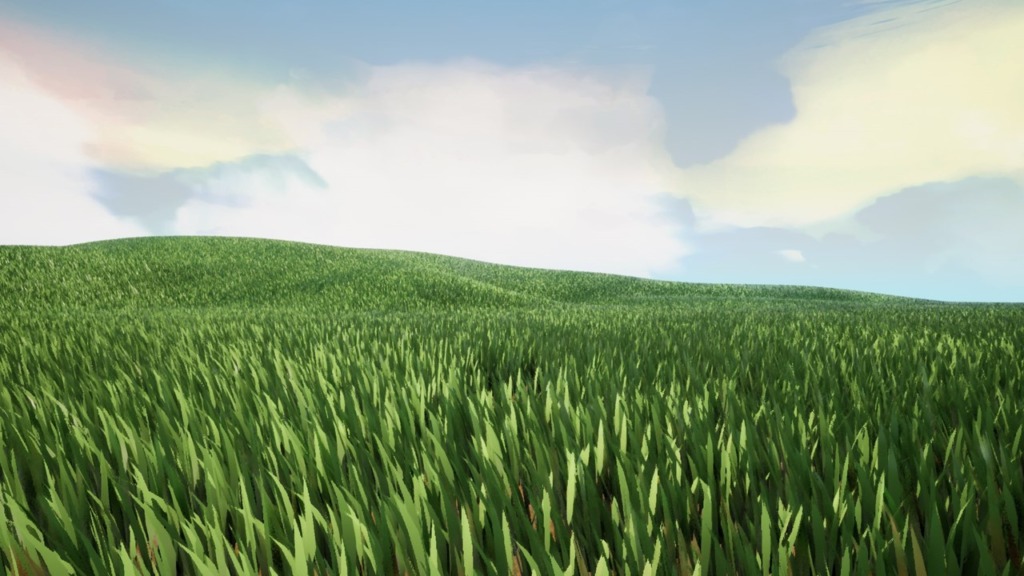
The goal is to turn a barren landscape into a good-looking, lifelike grass field by meeting these requirements. The grass system involves things like shading, movement, shape, and placement. Let’s take a closer look at most of these elements.
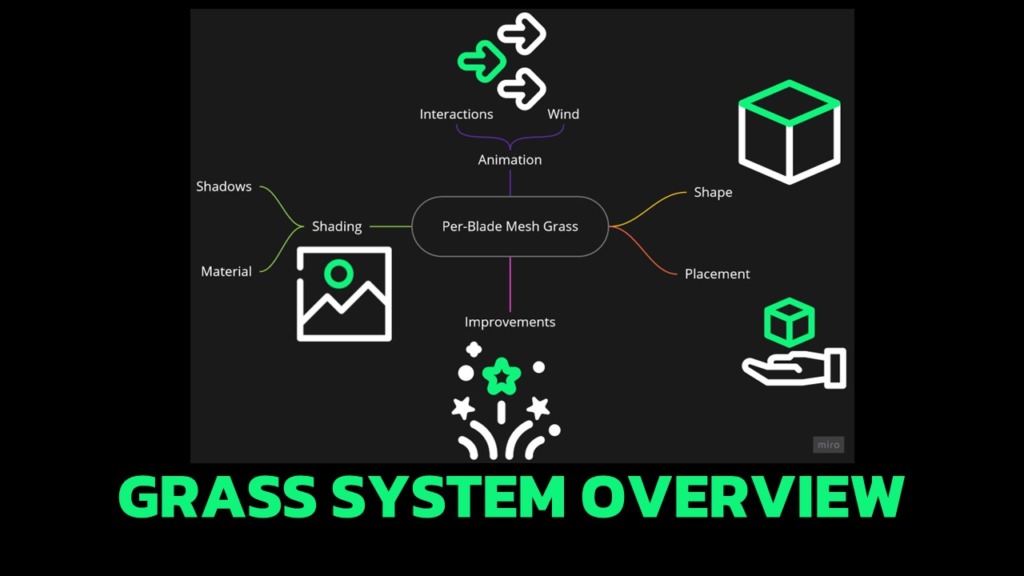
The journey of each grass blade towards rendering involves several steps, outlined in the slides. Initially, there’s input data transformed through compute shader into an instance data fed into vertex and pixel shaders.
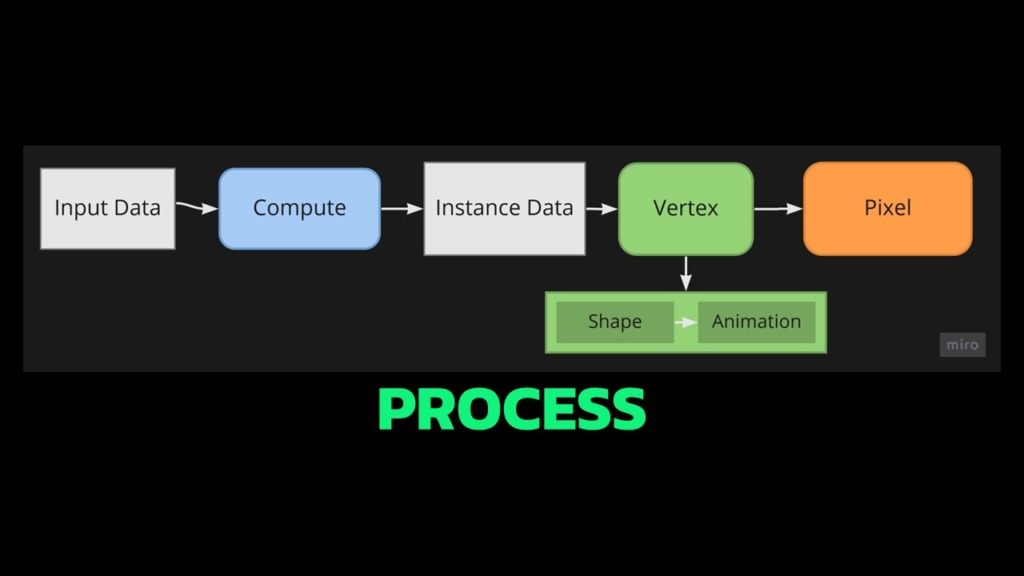
INPUT DATA
The first phase involves input data, adaptable to specific project needs. For instance, I use a height map to determine grass placement, along with wind and interaction textures to ensure interactivity. Parameters like area size (how much space the grass covers) and spawn count (density) are standardized. Additionally, requisite elements like models and materials are essential.
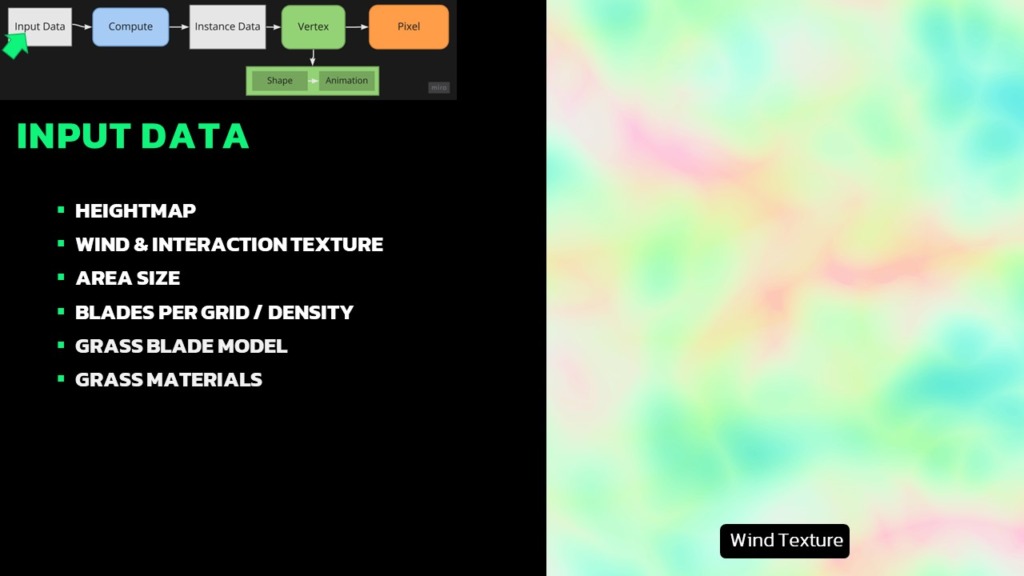
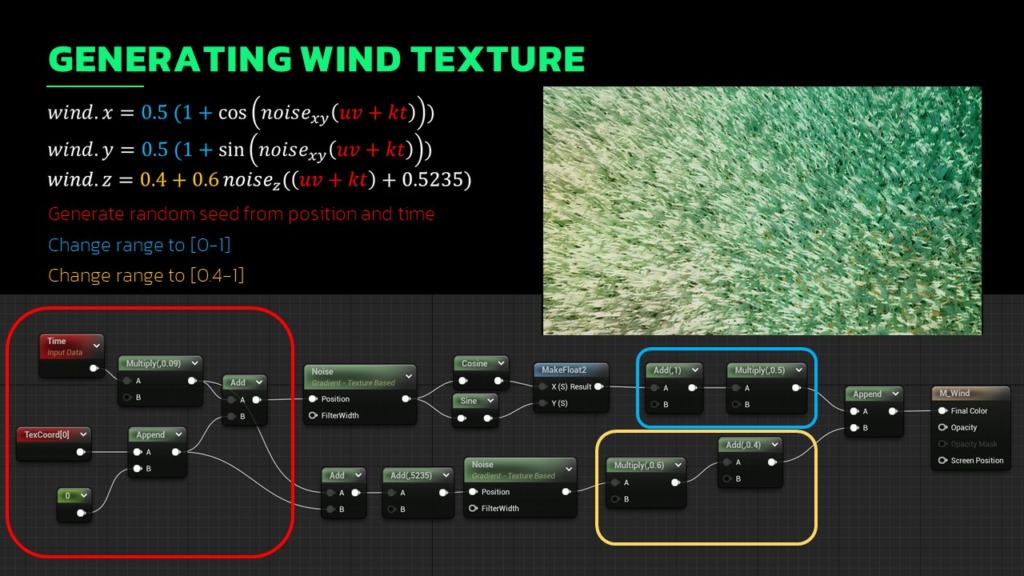
I have also created wind texture in Unreal. This texture is easily created by using a sequence of blocks driven by texture coordinates and time values. Despite wind being 2D, I use the Z coordinate to be wind strength at each position. It’s fascinating amazing how a few noise blocks and some manipulation can make a great-looking wind texture, perfect for animating grass in your material.
To allow interaction, I use standard render target textures. Placing the camera below ground level, I render the player’s feet onto this texture. This process captures the player’s position, enabling me to animate the grass by flattening it based on this data. The biggest benefit of this technique is its scalability; it handles multiple entities efficiently yet renders fast.
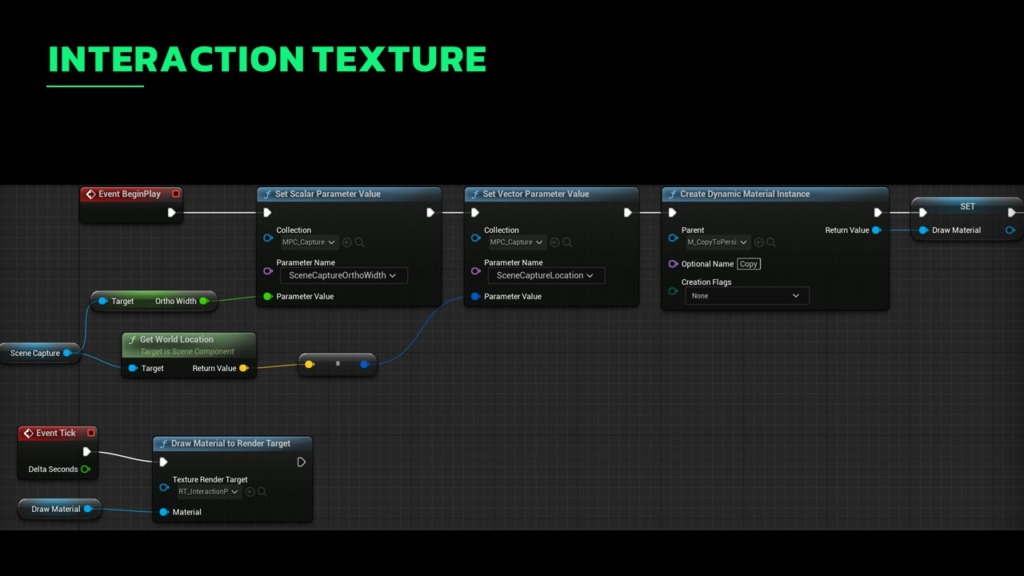
However, this approach requires a double-buffering setup for persistence. It ensures that the grass keeps its flattened state for a specified duration and allows for a gradual fading of the effect. Implementing a second interaction texture is necessary for this purpose. This texture essentially duplicates the data using a simple material setup, as depicted on the slide, making the entire process relatively straightforward.
HEIGHT MAP
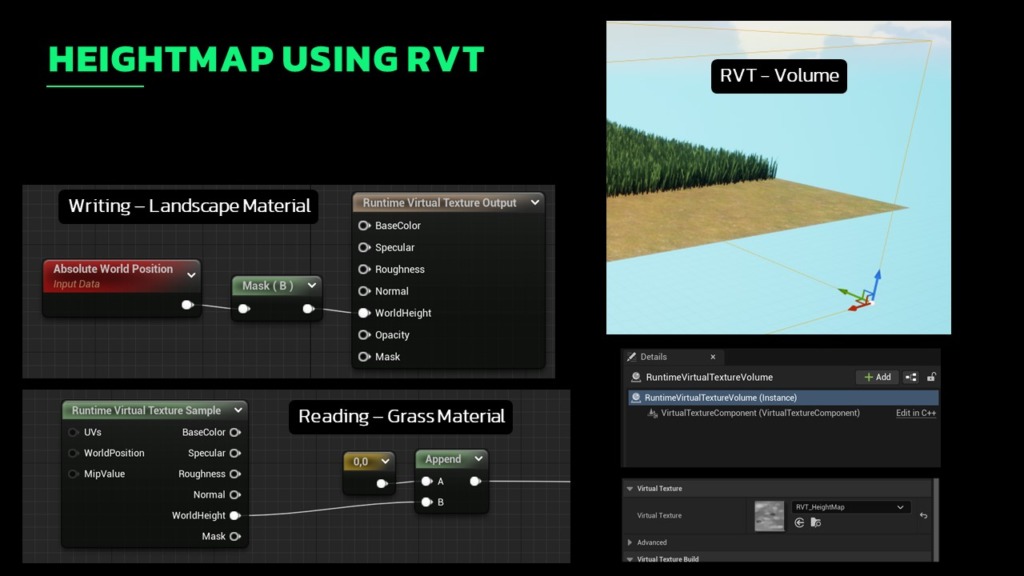
I implemented the height map using runtime virtual textures, a relatively new feature in Unreal Engine. It’s amazing how easily you can generate the height map for your terrain. The process involves setting up a volume and configuring a single block for runtime virtual texture output, specifying the wall height. This technique can also be used to extract color or normal from your landscape. This flexibility allows for blending rocks or seamlessly integrating environmental elements into the terrain, which is often extremely useful.
Once we’ve obtained our input data, I use Niagara to process it within the compute shader. This involves calculating the position, orientation, and Bézier curve parameters for shaping the grass and implementing animations. While Niagara lacks predetermined modules, I’ve developed custom ones, which is fairly straightforward by initiating a new scratch pad module through a simple process.
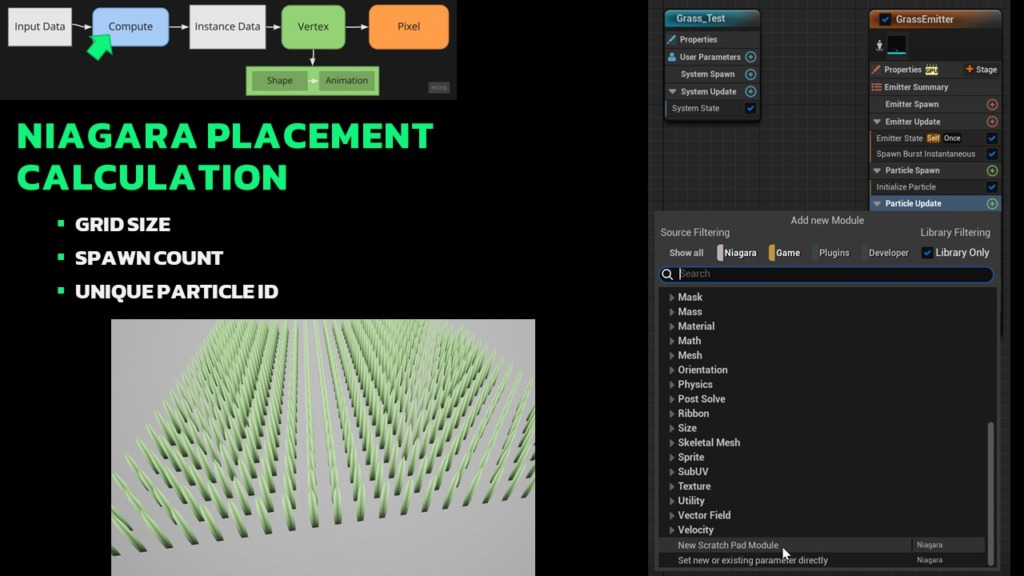
Our goal with the compute shader is to achieve a uniformly distributed grass layout in a grid pattern, allowing for slight variations to impart a natural appearance. Parameters such as grid size, spawn count, and unique particle IDs provided by Niagara influence our calculations. The logic behind these computations resembles the layout of blueprints or material editors, making it easier to understand.
The calculations involve basic operations, like deriving the square root of the spawn count to define a square area and calculating the cell size accordingly. However, it is key to avoid the direct use of unique particle IDs to prevent unwanted motion correlation between the grass blades and the system itself, which would appear unnatural. Instead, it’s important to calculate a hash based on each grass blade placement.
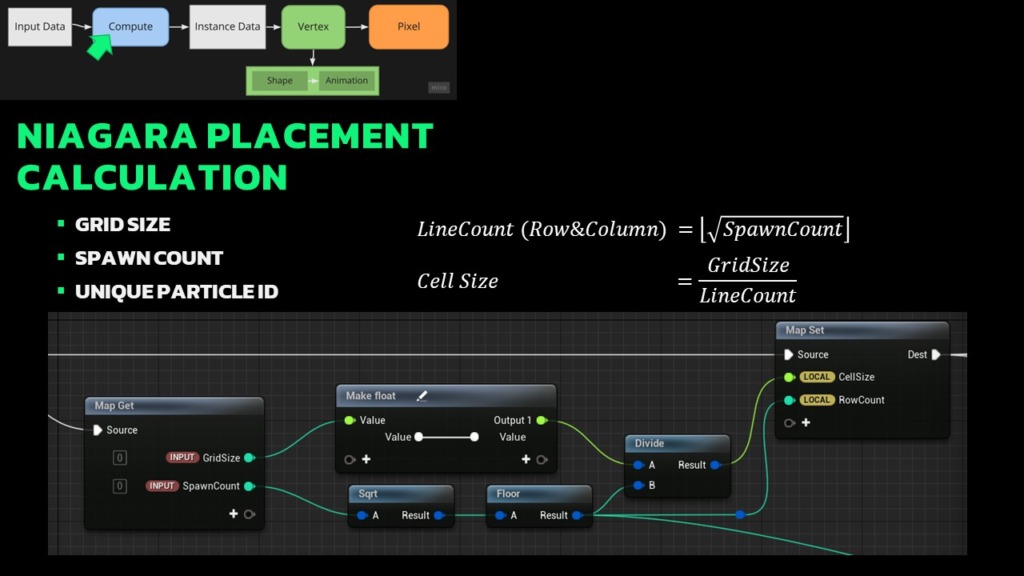
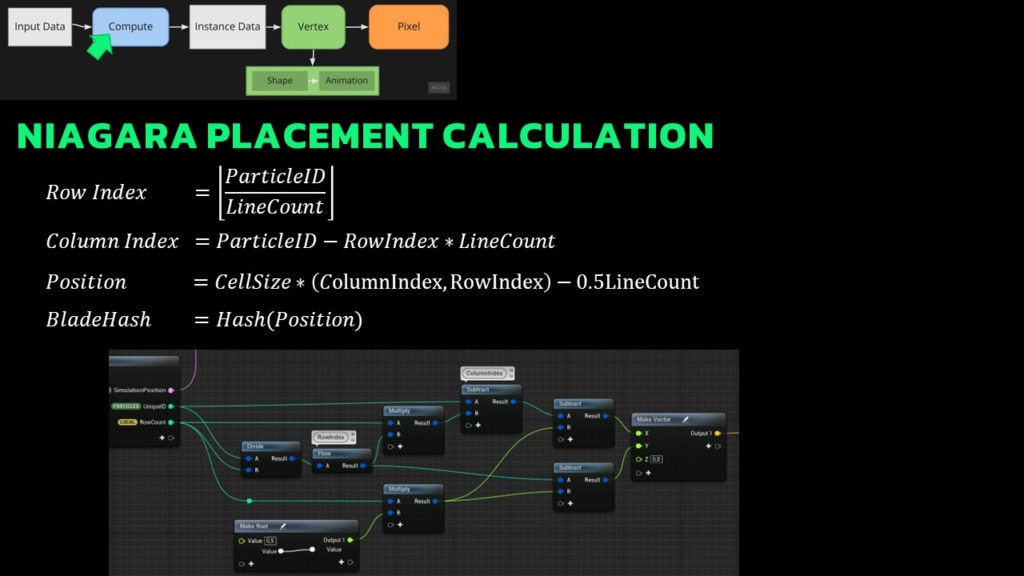
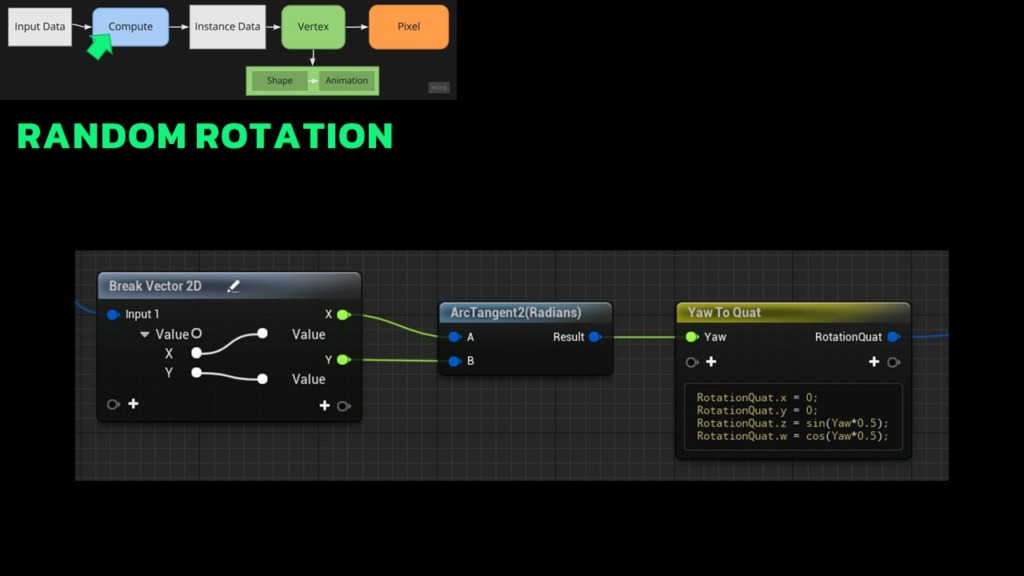
Additionally, I had to calculate random rotations manually. Despite internet and stack overflow warning about adverse effects of editing properties of quaternions, i.e., death, I’m still alive, which proves that they can be safely used for much more efficient calculations.
INSTANCE DATA
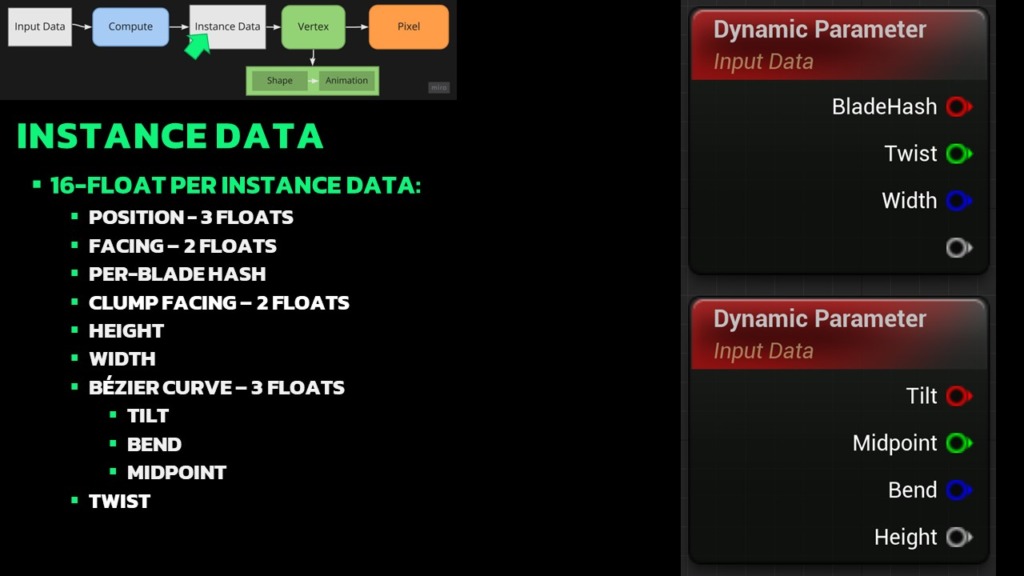
Now that we’ve gathered data from the compute shader, including details like position, facing direction, and per-blade hash, we move on to determining the visual attributes of our grass. There are three elements, not previously covered – the tilt, bend, midpoint, and Bézier curve parameters. These elements derive random values within specific ranges, influenced by the per blade hash.
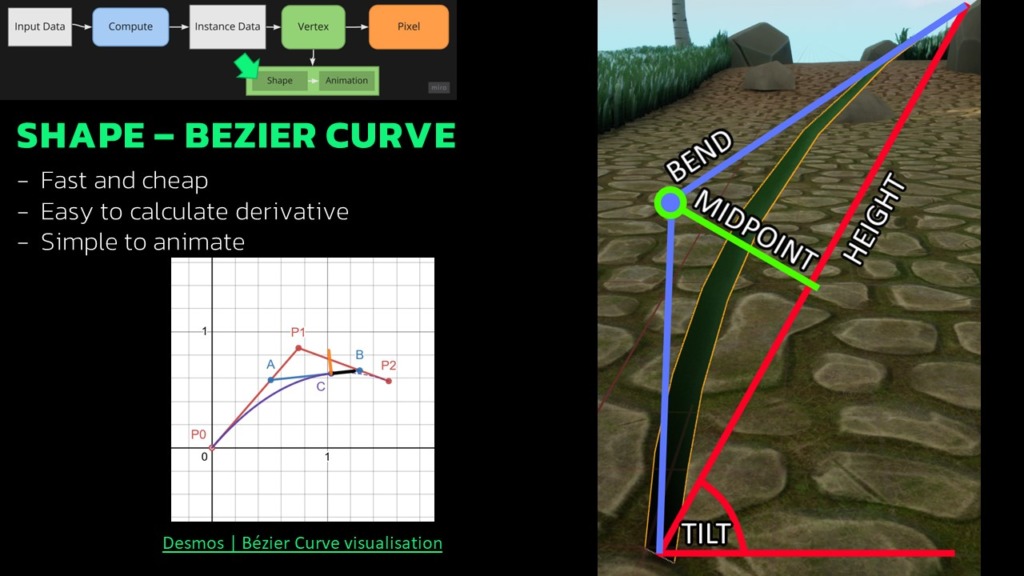
Calculating the Bézier curve involves defining the first point at the grass base (position 0;0) within a 2D space, disregarding the third dimension for simplicity. The endpoint is calculated using tilt and height parameters. The middle point is found between the start and end points, offset by the bend parameter. This technique, relying on linear interpolations, proves efficient and cost-effective. Its simplicity also enables straightforward derivative calculations.
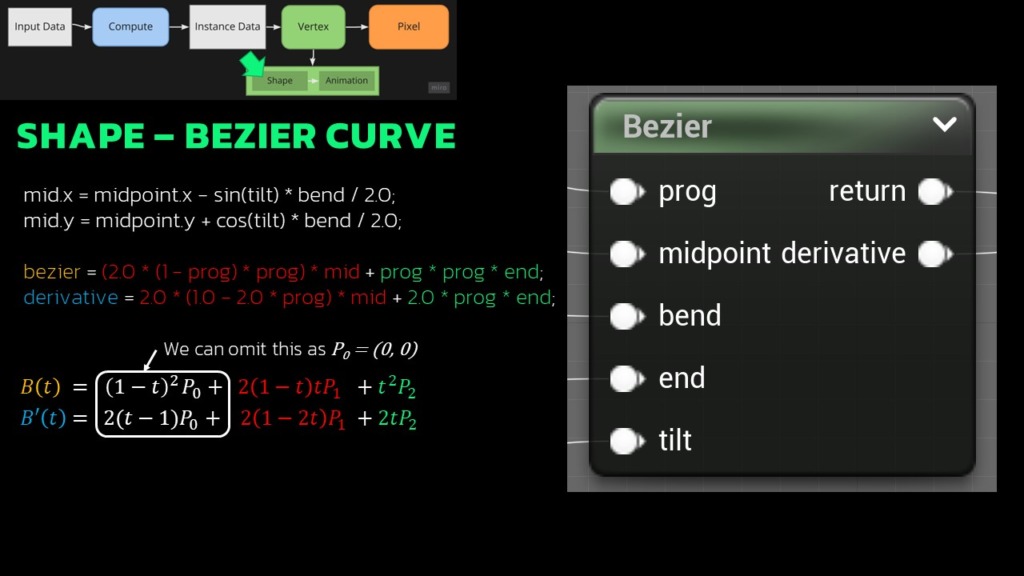
The formulas displayed above illustrate the straightforward nature of the Bézier formula and its derivative. We can simplify the Bezier calculation because the start point is at (0, 0). The derivative from definition is a tangent and using that tangent we can calculate the normal.
This, in turn, helps with lighting calculations.
Animating the grass involves manipulating points using a random wave generated through a combination of sine waves with diverse frequencies and amplitudes. While not the most efficient method, it works and looks good, so I left it for the time being.
PIXEL SHADER
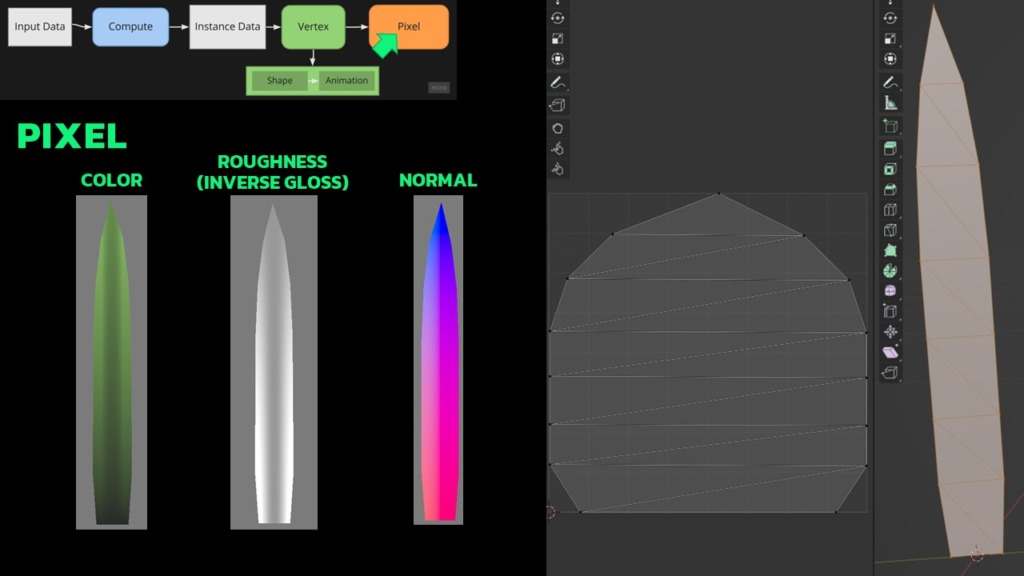
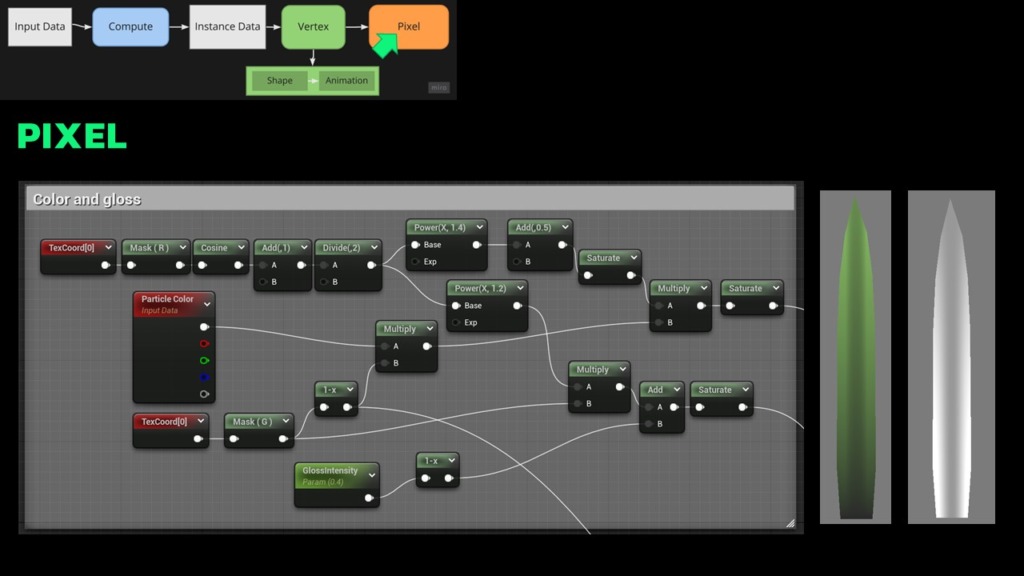
The last step in grass rendering involves the pixel shader, where we compute the grass color, roughness, and the normal. Color and roughness calculations primarily derive from texture coordinates. My focus here lies in computations that smooth the grass appearance across the x-coordinate, using various nodes for this purpose. As for the normal calculation, it’s derived from the derivative.
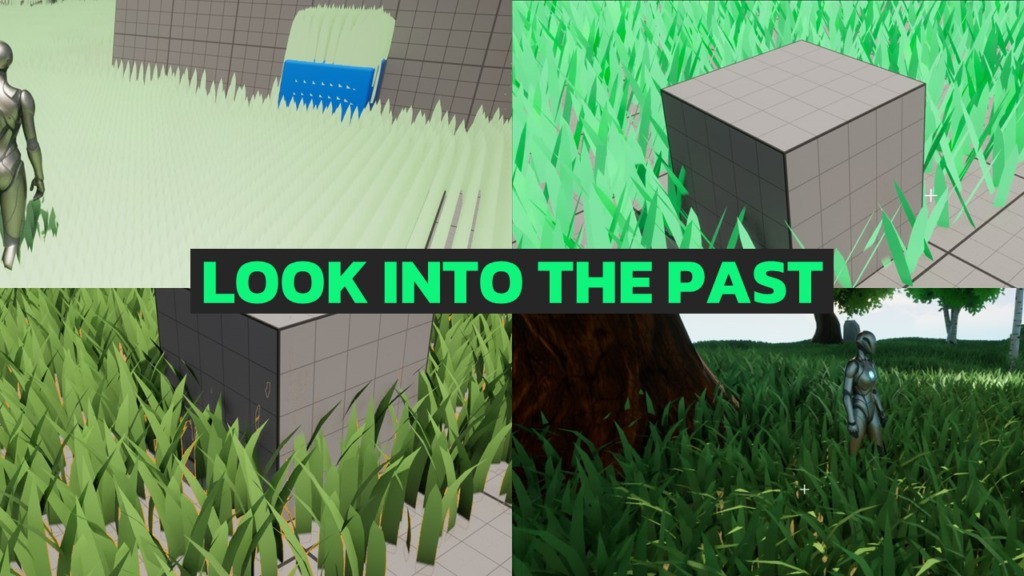
To illustrate the simplicity of implementation, consider the progress made within a few days of work. The first screenshot, visible in the top-left, shows my progress after several hours. The last screenshot was taken after just three days of work despite being new to Niagara and spending time on animations and interactions. This rapid progress over a week proves the efficiency and effectiveness of the process.
WATCH VIDEO:
